By: Sarah Aly, DO (@alyalyoxenfree_)
Case Presentation:
A 68-year old obese female with a past medical history of osteoarthritis, diabetes, and cervical spinal fusion presents to the Emergency Department (ED) complaining of generalized weakness for the last week. In addition, she reports that she had cold symptoms approximately one week before the onset of her weakness. Upon further questioning, the patient also reports numbness and tingling of her bilateral lower extremities. The review of systems is otherwise negative.
The patient is comfortably sitting on the stretcher on the physical exam, and vital signs are within normal limits. Visual inspection of her lower extremities reveals no signs of trauma, ecchymosis, bruising, or lacerations, and pulses are intact. She has 4/5 strength of her bilateral lower extremities and endorses decreased sensation of her bilateral lower extremities. Her range of motion is otherwise intact throughout.
Given the history of presumed viral illness, there is a concern for possible Guillain-Barre Syndrome (GBS). However, due to the patient’s history of cervical spinal fusion, MRI cannot be attained at this time. Negative inspiratory force is done bedside and within normal limits. The decision is made to pursue a lumbar puncture, and due to the patient’s body habitus, ultrasound guidance is considered.
Background:
Lumbar punctures, while in theory a straightforward procedure, can end up being time-consuming and difficult due to variability in patient anatomy and body habitus. A randomized control study done in 2013 revealed that procedures done under ultrasound guidance had far lower failure rates (0.96% v. 7.21%)1. In fact, there was also a significant risk reduction for failure (RR= 0.21, p <0.001), as well as for traumatic taps (RR= 0.27, p <0.005)1.
With this in mind, the use of ultrasound in identifying landmarks can increase efficiency in the ED. It can also provide greater patient satisfaction as they will not have to be poked and prodded multiple times in the quest for the perfect “champagne tap.” As with other procedures that were traditionally done blind, such as central lines and nerve blocks, ultrasonography proves advantageous in ensuring good outcomes all around.
Scanning Technique and Sonographic Findings:
Ultrasound-guided lumbar punctures are traditionally done as a static procedure in which the sonographer uses their images to identify the appropriate needle insertion site. Once the interspace is recognized, the procedure can proceed similarly to the blind technique. For identification of bony landmarks, use the curvilinear, low-frequency transducer on the midline of the spine in the longitudinal plane. This transducer is often better than the high-frequency probe in identifying structures that are deeper than 6-9cm2, which will be needed in patients with larger body habitus. Conversely, the linear high-frequency transducer may be used in patients who have a smaller body habitus.
After identifying the sacrum and L5, you may scan up to find the L4/L5 interspace or the L3/L4 interspace. The transducer should then be rotated into the transverse plane to identify the true anatomic midline and identify the direction of the spinous process. The midline can then be marked in preparation for the lumbar puncture.
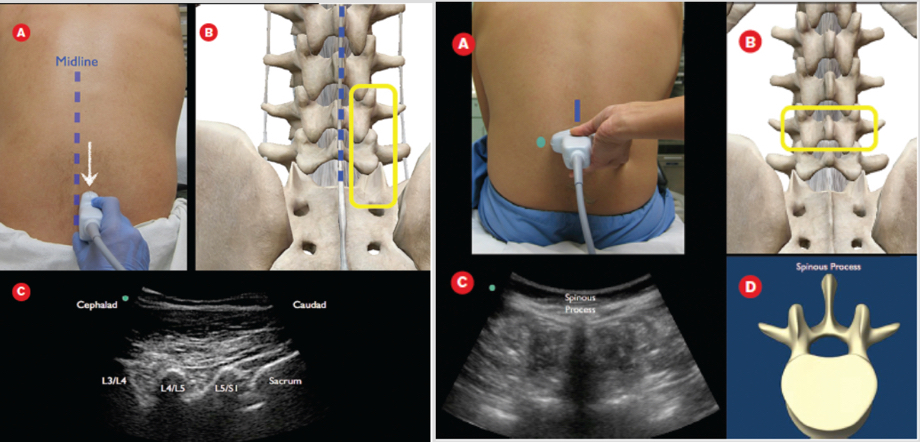
Figure 1: Images from “How to Perform an Ultrasound-Assisted Lumbar Puncture” in ACEPNow, 07/2014)
Ultrasound Technique:
- Have the patient in a seated position, with their feet supported on the ground, and have them moderately flex their neck to open up the interspinous spaces
- Place the curvilinear, low-frequency transducer in the longitudinal plane onto the midline of the spine, scanning up and down until you have a view of the sacrum and at least L5
- Scan up to identify the L4/L5 interspace, or L3/L4 if you prefer
- To identify the true anatomical midline, rotate the transducer into the transverse plane and scan laterally until the spinous process is centered
- Mark the midline in preparation for the lumbar puncture procedure
Case Ultrasound Findings:
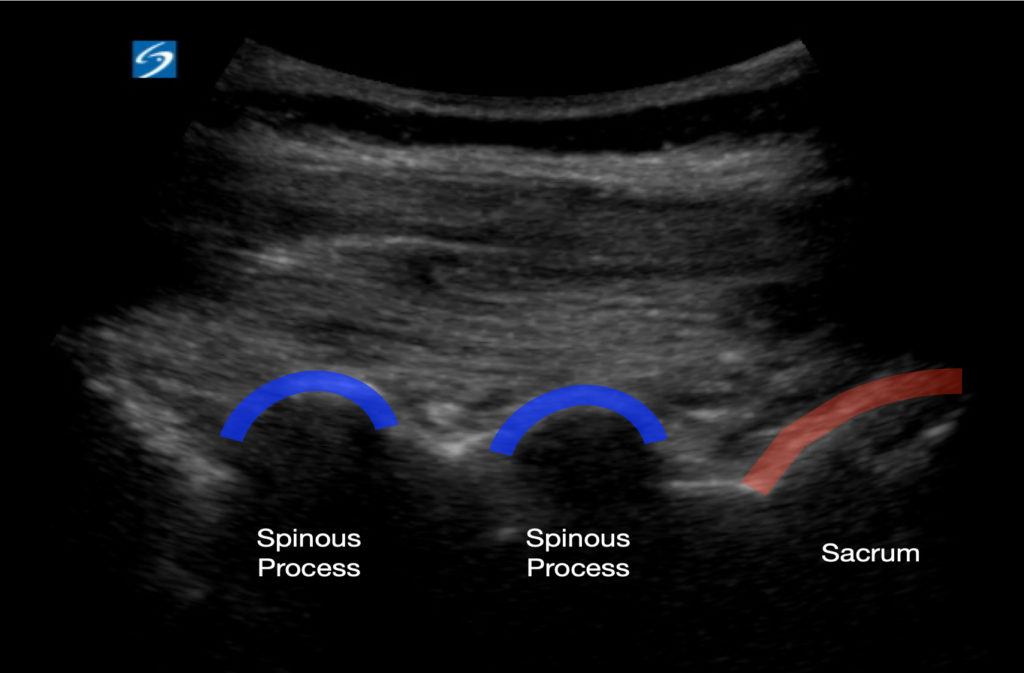
Figure2: Transducer in longitudinal axis displaying the L4/L5 spinous processes and sacrum

Figure 3: Transducer in Transverse Axis showing a spinous process in midline with posterior shadowing
Conclusion:
Lumbar punctures may end up taking ED physicians more time than anticipated due to the need for numerous attempts secondary to variable anatomy or patient body habitus. Ultrasound has proven to help reduce failure rates and the rates of traumatic taps. While we have not moved to a practice where ultrasound guidance is the norm in the pursuance of a lumbar puncture, it should always be considered for patients in whom you presume their anatomy/habitus may make the procedure challenging.
Case Resolution:
The lumbar puncture is done successfully, and results are sent off to the lab. Upon follow-up of the results, CSF is found to have increased protein, suggestive of GBS. The patient is admitted to the neurology floor and is started on IVIG for five days.
References:
- Swaminathan A, Hom J. Does ultrasonographic imaging reduce the risk of failed lumbar puncture? Ann Emerg Med. 2014;63:33–4.
- Nagdev, A., Riguzzi, C., Frenkel, O. and Mantuani, D., 2014. How To Perform An Ultrasound-Assisted Lumbar Puncture. ACEP Now. Available at: <https://www.acepnow.com/article/perform-ultrasound-assisted-lumbar-puncture/?singlepage=1> [Accessed 23 August 2020].
- Busti, A. and Kellogg, D., 2015. Procedure: How To Do A Lumbar Puncture. Ebmconsult.com. Available at: <https://www.ebmconsult.com/articles/procedure-lumbar-puncture> [Accessed 23 August 2020].
- UCSD Health. 2020. Standardized Procedure: Lumbar Puncture. [online] Available at: <https://health.ucsd.edu/medinfo/medical-staff/application/Documents/SP8%20Lumbar%20Puncture.pdf> [Accessed 23 August 2020].
Peer Reviewed by: Nicole Yuzuk, DO